| Build a junkyard DC motor |
|
It was raining today. I was bored... A piece of laquecoated copperwire caught my attantion. It's the kind of wire you'll find in transformers and other electronics. Then I decided to use the rainy afternoon to build a junkyard DC motor from the wire, a battery and a piece of cardboard. It's actually really easy. A kid can do it, and it's great fun! You'll need this: 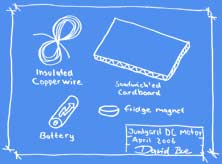 click to enlarge... Now follow the guide and within the hour you will have built a DC motor from scratch!. First you have to construct the base of the motor and the stator system. You'll need the cardboard, two pieces of the copperwire and the magnet. First you'd want to remove the nsulating coating from the ends of the two pieces of wire. It's really easy to scrape if off with a knife. Form two small brackets as shown below and press the wires through the cardboard. Run the wires on the back of the cardboard and press the wires through the cardboard again at the other end. The ends of the wires will be the terminals to which you'll connect the battery. Finally place the magnet between the brackets. Here's the blueprint: 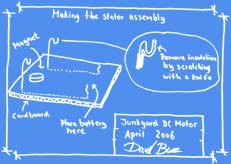 click to enlarge... Let's make the rotor. Grap the battery. Form a coil consisting of around 20 turns by turning the wire round the battery. Pull the battery out of the coil and tighten it by turning the two ends through the core. These two ends will act as an axle. An industrial grade DC motor has brushes that'll guide the electricity through the rotor at the correct moments to create the electromacnetic field that'll repulse the permanent magnet(s) of the stator. We'll do that by removing some coating at the right places on the axle of the rotor. Remove half of the coating on the two ends that form the axle. Do this by laying the coil on a table and scratch off the coating pointing upwards. Remove what corresponds to 180 degrees of coating. I've tried to show you what you'd want to remove on the blueprint below, marked with the number 3: 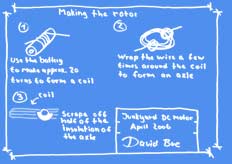 click to enlarge... You now have all the parts that form the DC motor. Place the rotor in the brackets of the stator. Place the battery between the two electrodes on the cardboard and you're ready to start up the motor. This is done in the following way. Press the electrodes towards the the poles of the battery. Give the rotor a small push to get it started, and watch it run!  click to enlarge... Here's a video of my motor in action. It actually runs quite fast. You can actually feel a tiny breeze rising from the rotor as it spins!!! Cool!!! The video is encoded in DivX format. You'll need the apropriate codec to be able to watch it! 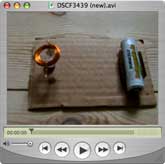 click to open... Here ends the guide. Thank you for reading! |